Introduction to Git in VS Code
Want to easily manage your source code and collaborate with others? Git and GitHub are the tools you need! And with Visual Studio Code, you can set up and use them in a snap. Even if you're a beginner, VS Code's user-friendly interface guides you through common Git actions like pushing and pulling code, creating and merging branches, and committing code changes. And if you're a pro, you'll love the ability to perform Git actions directly within the editor, saving you time and effort compared to using the Git command line. Plus, the seamless workflow between VS Code and Git means you can stay in your editor and get more done.
Set up Git in VS Code
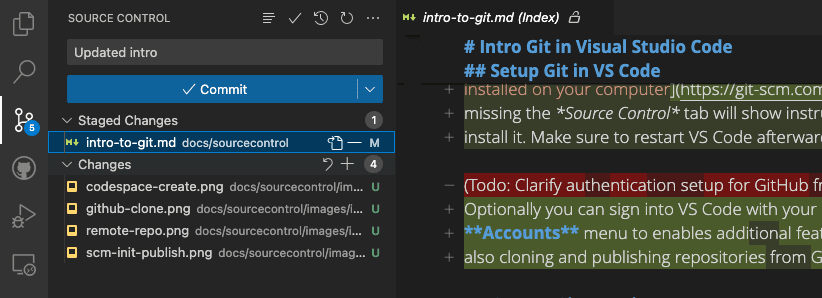
To use Git and GitHub in VS Code, first make sure you have Git installed on your computer. If Git is missing, the Source Control view shows instructions on how to install it. Make sure to restart VS Code afterwards.
Additionally you can sign into VS Code with your GitHub account in the Accounts menu in the lower right of the Activity bar to enables additional features like Settings Sync, but also cloning and publishing repositories from GitHub.
Open a Git repository
VS Code provides several ways to get started in a Git repository, from local to remote cloud-powered environments like GitHub Codespaces.
Clone a repository locally
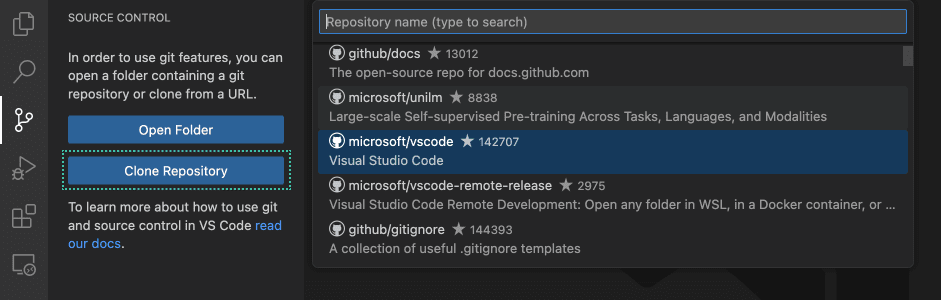
To clone a repository from GitHub, execute the Git: Clone command or select the Clone Repository button in the Source Control view. If you clone from GitHub, VS Code will prompt you to authenticate with GitHub. This allows you to search all available repositories and clone private repositories. For other Git providers, enter the repository URL and select Clone and pick a folder. VS Code opens the folder once the repository is cloned on your local machine.
Initialize a repository in a local folder
To initialize a new local repository, pick an existing or new folder on your computer and open it in VS Code. In the Source Control view, select the Initialize Repository button. This creates a new Git repository in the current folder, allowing you to start tracking code changes.
Publish local repository to GitHub
Once you have a local Git repository set up, you can publish it to GitHub. This will create a new repository on your GitHub account, and push your local code to the remote repository. Having your source code on a remote repository is a great way to back up your code, collaborate with others, and automate your workflow with GitHub Actions.
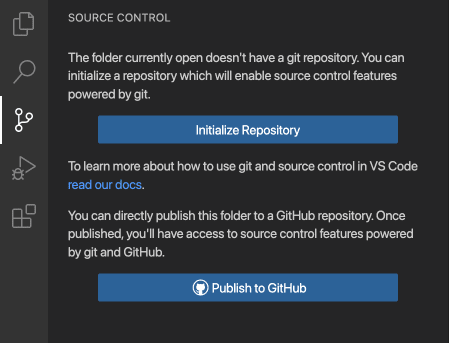
Use the Publish to GitHub command button in the Source Control view. You can then choose a name and description for the repository, and whether to make it public or private. Once the repository has been created, VS Code will push your local code to the remote repository. Your code is now backed up on GitHub, and you can start collaborating with others with commits and pull requests.
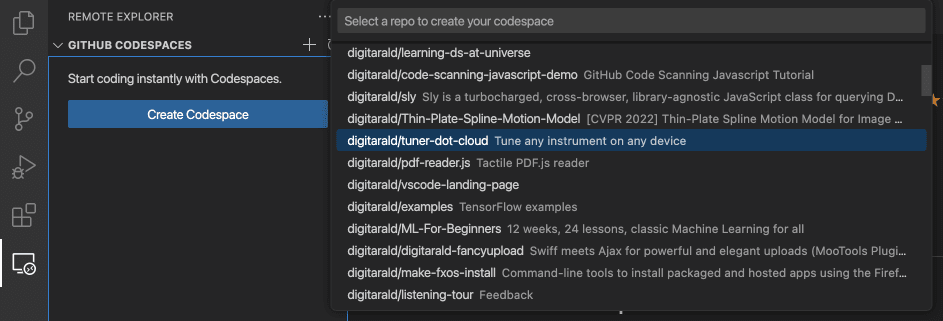
Open a GitHub repository in a codespace
GitHub Codespaces let you open a GitHub repository in a full configured cloud-based development environment, allowing you to develop in a browser without having to install any software on your local computer. GitHub Codespaces allows free usage for individuals, which makes it easy to get started working on open source projects.
Install the GitHub Codespaces extension into VS Code and sign in with GitHub. Run the Codespaces: Create New Codespace command and pick the repository and branch you want to open. The new codespace will open in a new window.
Alternatively, you can also start with a template from the GitHub's Codespaces site. If you already have a codespace open in your browser, you can open it in your VS Code Desktop by running the Codespaces: Open in VS Code Desktop command. You can learn more about GitHub Codespaces, including customization such as forwarding ports, in the Developing in a codespace documentation.
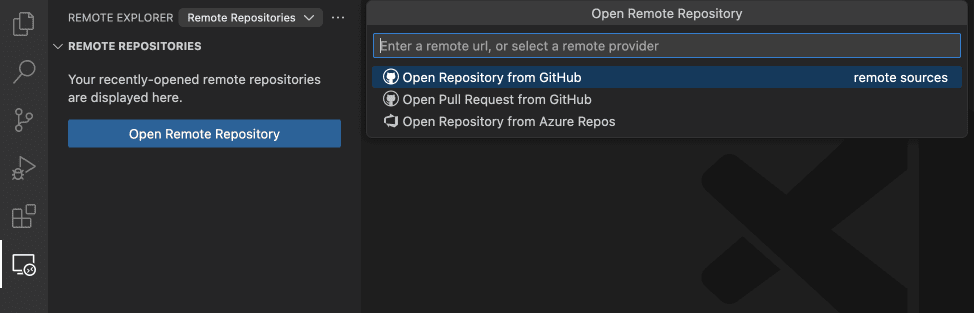
Open a GitHub repository remotely
VS Code's remote repository support allows you to browse and edit a GitHub repository without cloning it to your local computer. This is useful for quickly making changes to a remote repository without having to clone the entire codebase to your machine.
First install the GitHub Repositories extension. Run the command Remote Repositories: Open Remote Repository... or use the Open Remote Repository button the Explorer view. Search and select the GitHub repository that you want to open.
Tip: If you need to execute code or run terminal commands, you can seamlessly switch from a remote repository to a codespace with the command Continue Working on.
Staging and committing code changes
Once you have a Git repository set up, you can start tracking code changes by staging and committing your newly created and edited code.
Tip: Commit your changes early and often. This will make it easier to revert back to previous versions of your code if needed.
To stage a file, select the + (plus) icon next to the file in the Source Control view. This will add the file to the Staged Changes section, indicating that it will be included in the next commit. Staged changes can also be discarded by selecting the − (minus) icon next to the file.
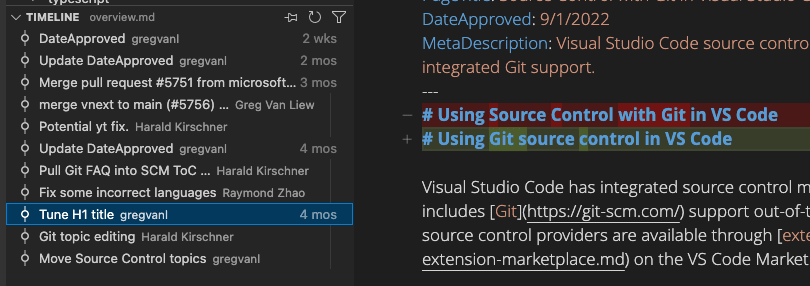
To commit your staged changes, type a commit message in the upper text box and select the Commit button. This saves your changes to the local Git repository, allowing you to revert to previous versions of your code if needed. You can navigate through and review all local file changes and commits in the Timeline view available in the bottom of the Explorer.
Pushing and pulling remote changes
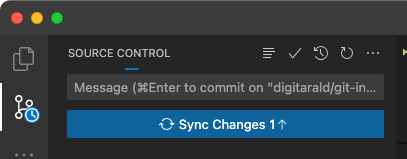
Once you have made commits to your local Git repository, you can push them to the remote repository. The Sync Changes button indicates how many commits are going to be pushed and pulled. Selecting the Sync Changes button downloads (pull) any new remote commits and uploads (push) new local commits to the remote repository.
Tip: You can enable the Git: Autofetch setting to always get an up-to-date remote commit indicator.
Push and pull can also be performed individually by using their respective commands.
Using branches
In Git, branches allow you to work on multiple versions of your codebase simultaneously. This is useful for experimenting with new features or making large code changes without affecting the main codebase.

The branch indicator in the Status bar shows the current branch and lets you switch to new and existing branches. To create a new branch, select the branch indicator and choose to create it from the current branch or another local one. Type a name for the new branch, and confirm. VS Code creates a new branch and switches to it, allowing you to make changes to your code without affecting the main branch.
Tip: If you use the GitHub Pull Requests and Issues extension, you can create a branch directly from an issue, which gets you started working in a new local branch and automatically prefills the pull request for you.
To push the branch to the remote repository, select Publish Branch in the Source Control view. This will create a new branch on the remote repository, allowing you to collaborate with others in that branch.
Creating and reviewing GitHub pull requests
In Git and GitHub, pull requests (PRs) are a way for collaborators to review and merge code changes from separate branches into the main branch. This allows teams to review and approve code changes before they are incorporated into the main codebase, ensuring that only high-quality changes are merged.
To use pull requests in VS Code, you need to install the GitHub Pull Requests and Issues extension. This extension adds PR and issue tracking functionality to VS Code, allowing you to create, review, and merge PRs from within the editor.
To create a PR, make sure you are on a separate branch from the main branch, and push your code changes to the remote repository. In the Source Control view, select the Create Pull Request button. This will open the PR creation form, where you can enter a title and description for the PR, and choose which branch to merge the changes into. Select Create to create the PR.
To review a PR, select the Review Pull Request button in the Source Control view, and select the PR you want to review. This will open the PR in a new editor window, where you can review the code changes and leave comments. Once you are satisfied with the code changes, you can select the Merge button to merge the PR into the targeted branch.
Learn more about pull requests in VS Code's GitHub documentation.
Using Git in the built-in terminal
As all Git state is kept in the local repository, you can easily switch between VS Code's UI, the built-in terminal, or external tools like GitHub Desktop. You can also set up VS Code as your default Git editor, allowing you to use VS Code to edit commit messages and other Git-related files.
Git Bash on Windows
Git Bash is a popular shell environment for Windows that provides a Unix-like command-line interface for working with Git and other command-line tools. Visual Studio Code's integrated terminal supports Git Bash as a shell, allowing you to seamlessly integrate Git Bash into your development workflow. Installing Git on your Windows machine will also install Git Bash, if it wasn't deselected during the installation steps.
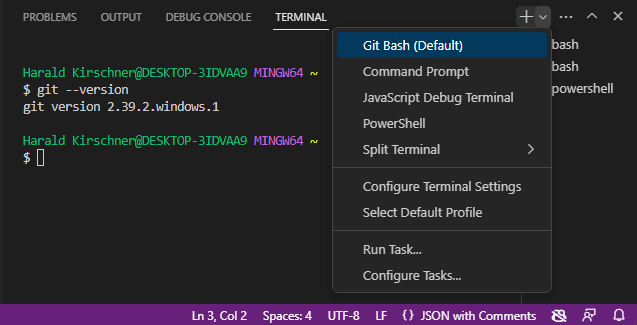
Start by opening View > Terminal (⌃` (Windows, Linux Ctrl+`)). Click on the dropdown arrow next to the + icon in the terminal panel to pick a new shell to open. If Git Bash is installed, it will be shown in the list. You can toggle between different terminals and shells in the Terminal sidebar. With Git Bash configured in Visual Studio Code, you can now use all of your favorite Git commands directly from the terminal in your code editor.
If you want to set Git Bash as your default shell, open the Terminal dropdown (next to the + icon) and select Select Default Profile. This will open a list of available shells, including Git Bash. Selecting Git Bash will set it as your default shell, and all future terminals will be opened with Git Bash. More advanced tips are available in the terminal documentation.